Hmm, sadly we did not find anything. Just retry with a different search.
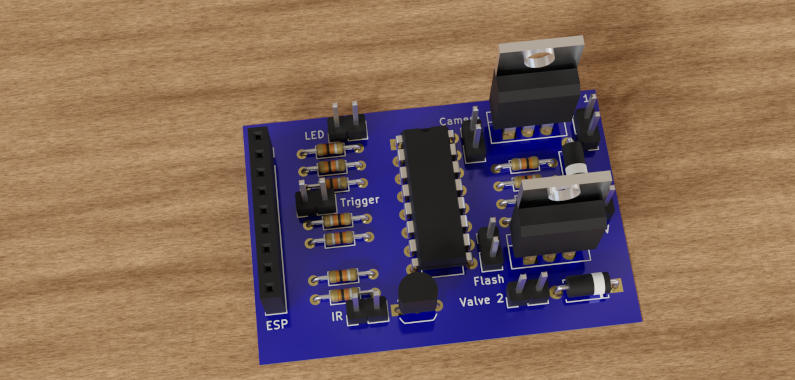
Electronics to trigger Cameras, Flash and other things
Grumpy Developer Reading time:about 7 min Date: Language:english
Are you ready to create breathtaking water drop videos like a pro? I've developed a DIY system that uses an ESP8266 module, WiFi connectivity, and opto couplers to control the precise timing of water drops. With this project, you can create stunning visuals by synchronizing the release of water droplets with camera flashes and triggering high-speed cameras.
The system is incredibly versatile, allowing you to experiment with different LED lights, valve configurations, and even colored waters. You can use it to create mesmerizing effects like "drop-on-drop" or add an extra layer of complexity with multiple valves and electronics.
To get started, I've made the source code and electronics plans available for free on The Camera Trigger repository. If you're ready to unleash your creativity and push the boundaries of water drop videography, check it out!
Building a keyboard filter part 3
Grumpy Developer Reading time:about 6 min Date: Language:english
In our PS2 keyboard filter project, we've made significant progress in defining states and implementing a main loop that handles key presses. We've also successfully integrated the EEPROM for storing and reading our configured keys, making it power cycle or reset-safe.
The code snippet showcases how we handle different keyboard gestures, including pressing and releasing keys, as well as filtering out unwanted inputs. The program uses an enum to define states, which makes the code more readable and maintainable.
As you read on in this series, you'll learn about the intricacies of EEPROM reading and writing, as well as implementing a scroll lock LED blinking feature. You'll also discover how to create a filter configuration system that allows users to customize their keyboard shortcuts.
Whether you're an experienced programmer or just starting out with Arduino or PS2 programming, this project series is designed to guide you through the process of creating a custom keyboard filter. So, what are you waiting for? Dive into the next part of the series and start building your own PS2 keyboard filter!
DIY air quality sensor
Grumpy Developer Reading time:about 14 min Date: Language:english
Building a keyboard filter part 2
Grumpy Developer Reading time:about 8 min Date: Language:english
If you're looking to create a custom keyboard filter for your PS/2 to USB conversion project, I've recently found an Arduino library that makes it relatively easy. This approach allows you to strip down the example to its bare essentials and integrate your own filter functions.
By using a library like HID-Project, which includes a PS/2 keyboard class, you can create a custom filter that allows you to control which keys are sent through the USB port. This is perfect for those who want more precise control over their keyboard's functionality.
Building a keyboard filter part 1
Grumpy Developer Reading time:about 5 min Date: Language:english
Imagine having complete control over your gaming experience without getting thrown out of games due to accidental key presses. A keyboard filter can help you achieve this. In our series, we'll explore how to design and build such a system from scratch.
The product aims to create a custom keyboard that filters out unwanted key presses, allowing gamers to focus on their game without interruptions. The approach combines knowledge of keyboard mechanics with the flexibility of Arduino programming.
In Phase 1: Design, the author outlines their plan to use PS/2 keyboards for simplicity and ease of implementation. The system will interrupt the connection between the computer and keyboard, filtering out unwanted key presses, and sending only desired ones to the computer.
To make it programmable, the author plans to define multiple sets of filter actions that can be enabled or disabled via keyboard shortcuts, making it easy to customize the experience for each user. This innovative approach allows users to personalize their gaming experience without relying on complicated setup procedures.
Join us as we delve into the Phase 2: Hardware Setup section, where we'll explore the intricate details of tapping wires and setting up the Arduino board to create this unique keyboard filter system.