Using putty without password (private/public key auth)
By default putty uses an interactive dialog for username and password.
SSH allows login without passwords by using a public/private key pair.
To enable this, you need to create above mentiones key pair first.
Generate key pair
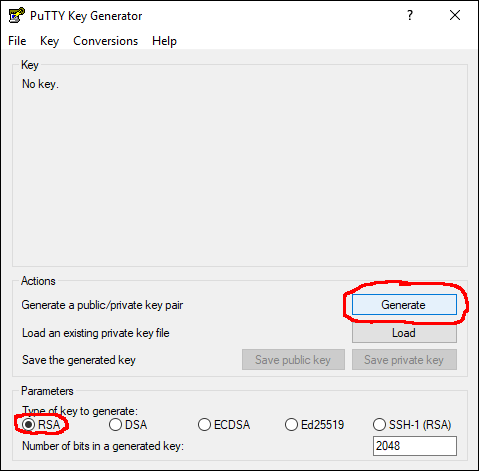
- start puttygen
- check that "Type of key to generate" is set to RSA (this is the default)
- click "Generate"

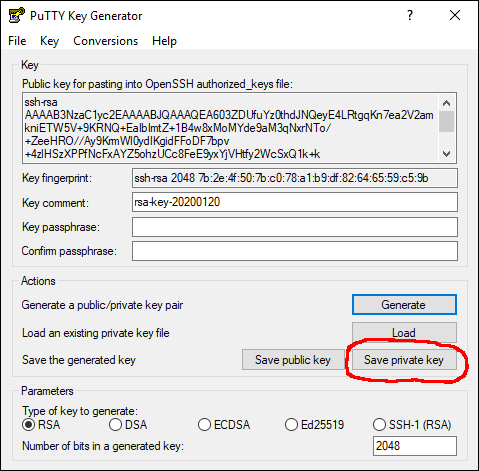
- click "Save private key", pick a location and a file name.

- leave puttygen open for now, later you need to copy/paste the public key in the top field.
Save public key on server
Now it is time to login into your machine with the password.
To enable the key auth, you may need to create the directory ".ssh" in your home directory, if it does not exist yet.
mkdir ~/.ssh
Ignore any File exists errors.
Change to the newly created directory:
cd ~/.ssh
Use a text editor to create the file "authrozed_keys". Here using nano, feel free to use vi or emacs depending on your masochism level.
nano -w authorized_keys
copy & paste the public key from puttygen in the top (mark it, press ctrl+c), to paste it press the right mouse button inside the putty window.
Save with ctrl+w and exit nano with ctrl+x
Adjust key permissions
By default the created files and directory are not strict enough so ssh won't use it.
Fix this by running:
chmod 700 ~/.ssh
chmod 600 ~/.ssh/authorized_keys
Configure putty to use private key
To enable the private key:
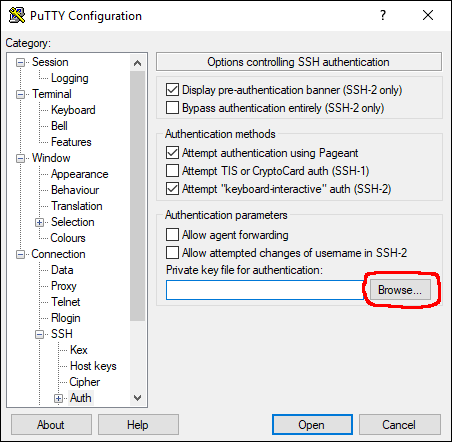
- go to the settings, Connection, SSH, Auth.
- Click the Browse button and pick the file you created in the beginning

Now start another putty session and check if you can log in without entering a password.
Bonus Tip: Setting up a ssh-tunnel
A ssh tunnel is a connection from your local machine to the connected machine where every traffic is secured with the running ssh session. Useful if you want to reach a service on the remote machine that is not exposed to the internet, like a database server.
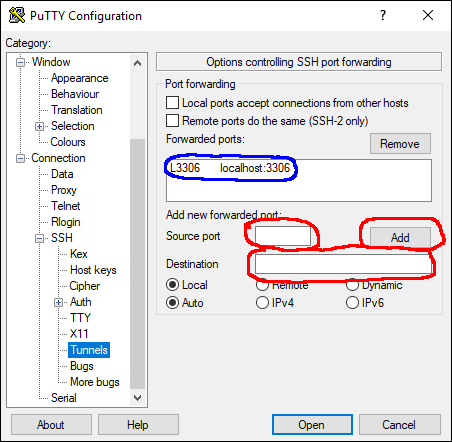
- Go to Settings, Connection, SSH, Tunnels
- Enter source port (this is the port on the local machine)
- Enter destination in the format "targetip:port" Target IP can be localhost or any other IP that is reachable from the remote host. Don't forget to hit the Add button.
Unless it is shown in the "Forwarded ports" list (marked blue) it won't be saved.
Now you database server should be reachable via localhost port 3306.
Btw. SSH can also tunnel Remote ports, so your remote machine can access services running on your local machine or the network your local machine is in.